Contents of this article
in this article, I describe the Configuration of an IP Address on a Router Interface. Configuring an IP address on a router interface is a fundamental task in network administration and design. Routers play a critical role in directing data traffic between different network segments, and assigning IP addresses to router interfaces is essential for facilitating this communication. In this comprehensive guide, we will explore the step-by-step process of Configuration of an IP Address on a Router Interface.
Types of Router Interfaces
Routers are equipped with multiple interfaces, each representing a physical or logical connection to a specific network segment. These interfaces serve as gateways for data to enter or exit a particular network. Here are some common types of router interfaces:
- Ethernet Interfaces: These are used to connect routers to Ethernet LANs, typically using RJ45 connectors. Ethernet interfaces may have various speeds, such as 10/100/1000 Mbps (Fast Ethernet or Gigabit Ethernet).
- Serial Interfaces: Serial interfaces are used for connecting routers over WAN links, such as leased lines, T1/E1 lines, or serial cables. They often operate at lower speeds compared to Ethernet interfaces.
- Loopback Interfaces: Loopback interfaces are virtual interfaces that allow routers to communicate with themselves. They are often used for diagnostics, management, or as the source IP address for certain services.
- Subinterfaces: Subinterfaces are logical divisions of physical interfaces. They are used for segmenting traffic within a single physical interface, often in VLAN (Virtual LAN) or VRF (Virtual Routing and Forwarding) configurations.
- Tunnel Interfaces: Tunnel interfaces are used for creating virtual point-to-point or multipoint connections over an existing network, often for VPNs or encapsulation of traffic.
Purpose of Configuration of an IP Address on a Router Interface
Configuration of an IP Address on a Router Interface serves several crucial purposes as following:
- Routing: Routers use IP addresses on their interfaces to determine how to route data traffic between networks. Each interface represents a different network segment, and the IP address assigned to it defines the network’s identity.
- Network Segmentation: IP addresses on router interfaces allow for network segmentation. By assigning distinct IP address ranges to different interfaces, network administrators can create isolated subnets or VLANs, enhancing network security and performance.
- Gateway Functionality: Router interfaces act as gateways for devices within their respective networks. Devices use the router’s IP address on their subnet as the default gateway to reach devices on other networks.
- Routing Protocols: When routers communicate with each other to exchange routing information, they use the IP addresses of their interfaces. Configuring IP addresses on router interfaces is essential for enabling dynamic routing protocols like OSPF, EIGRP, or BGP.
- Remote Management: Network administrators often access routers remotely for configuration and troubleshooting. Assigning an IP address to a router interface allows remote access via SSH, Telnet, or web-based interfaces.
Step-by-Step Guide to Configuration of an IP Address on a Router Interface
Now, let’s walk through the step-by-step process of Configuration of an IP Address on a Router Interface. We’ll use a Cisco router as an example, but the general principles apply to routers from other manufacturers as well.
1. Access Router CLI
To configure a router’s interface, you need to access its Command Line Interface (CLI). You can do this using a console cable connected directly to the router’s console port or through a remote connection using SSH or Telnet.
In the packet tracer double-click on router and select the CLI tab.
2. Enter Privileged Exec Mode
Once you’re in the router’s CLI, start by entering privileged exec mode, also known as enable mode. This mode grants you elevated privileges to configure the router:
Router> enable
Router#
You should see a prompt change from Router> to Router#, indicating that you’re in enable mode.
3. Access Global Configuration Mode
From enable mode, access global configuration mode, which is where you configure global settings for the router. Use the configure terminal (or conf t for short) command:
Router# configure terminal
Router(config)#
Your prompt should now change to Router(config)#, indicating that you’re in global configuration mode.
4. Select the Interface to Configure
Identify the interface to which you want to assign an IP address. You can do this by using the show interfaces command, which lists all available interfaces on the router. For example, if you want to configure an Ethernet interface, it might be labeled as GigabitEthernet0/0.
5. Access Interface Configuration Mode
Enter the configuration mode for the chosen interface using the interface command followed by the interface identifier:
Router(config)# interface GigabitEthernet0/0
Router(config-if)#
Your prompt should now show the specific interface you’re configuring, such as Router(config-if)#.
6. Assign an IP Address
With the interface configuration mode active, assign an IP address to the interface using the ip address command. Specify the IP address followed by the subnet mask:
Router(config-if)# ip address 192.168.1.1 255.255.255.0In this example, we’ve assigned the IP address 192.168.1.1 to the interface with a subnet mask of 255.255.255.0.
7. Enable the Interface
Activate the interface by using the no shutdown command. This command ensures that the interface is operational and can transmit and receive data:
Router(config-if)# no shutdown8. Exit Interface Configuration Mode
Exit the interface configuration mode to return to global configuration mode:
Router(config-if)# exit
Router(config)#
9. Save Configuration
To ensure that your configuration persists after a router reboot, save it to non-volatile memory using the write memory (or copy running-config startup-config or wr for short) command:
Router(config)# end
Router# write memory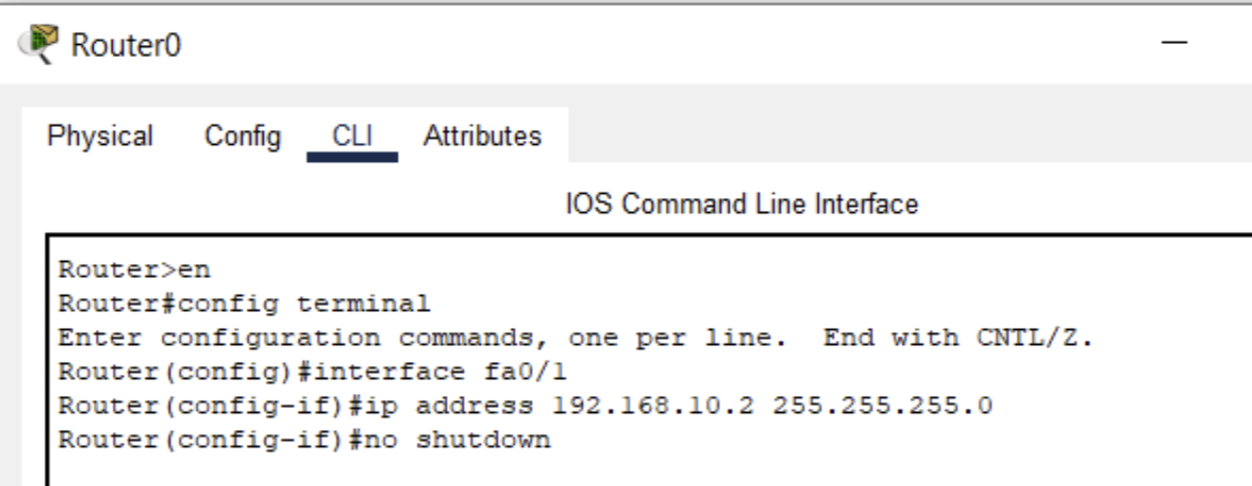
Verification and Testing of Configuration of an IP Address on a Router Interface
After configuring the IP address on the router interface, it’s crucial to verify the configuration to ensure it’s correct. You can do this by using various commands, including:
show ip interface brief: This command displays a summary of all interfaces and their IP addresses.show interfaces <interface>: Replace<interface>with the specific interface you configured to see detailed information about that interface.ping <ip_address>: Use thepingcommand to test connectivity to other devices on the same subnet or to remote networks.show ip route: This command displays the routing table, showing the networks the router knows how to reach.
By using these commands, you can confirm that the router interface is configured correctly and that it can communicate with other devices on the network.
Additional Considerations for Configuration of an IP Address on a Router Interface
Here are some additional considerations when configuring IP addresses on router interfaces:
- Subnet Design: Ensure that the IP addresses you assign to router interfaces are part of the correct subnet design. Proper subnetting is essential for efficient IP address allocation.
- Default Gateway: Devices on a subnet need to know the IP address of the router interface on that subnet as their default gateway. Ensure that this information is correctly configured on devices within the subnet.
- Security: Consider implementing access control lists (ACLs) on the router interfaces to control inbound and outbound traffic, enhancing network security.
- Dynamic Address Assignment: In some cases, you may want to use DHCP (Dynamic Host Configuration Protocol) to dynamically assign IP addresses to devices on a subnet. Ensure that DHCP configured correctly on the router if needed.
- Monitoring and Maintenance: Regularly monitor router interfaces for performance, errors, and traffic patterns. Implement a robust maintenance plan to keep router configurations up-to-date and secure.
Conclusion for Configuration of an IP Address on a Router Interface
Configuration of an IP Address on a Router Interface is a fundamental task in network administration. It plays a pivotal role in routing data traffic, facilitating network communication, and defining network boundaries. By following the step-by-step guide outlined in this comprehensive overview, you can effectively configure IP addresses on router interfaces, ensuring that your network operates efficiently and securely. Understanding the importance of this task is essential for network administrators and engineers responsible for maintaining and designing complex network infrastructures. I hope you found this article useful related to the Configuration of an IP Address on a Router Interface.


