Contents of this article
In this article, I describe the Basic Configuration of Router: packet tracer. Configuring a router is a critical task in network administration and design. Routers serve as the backbone of networks, responsible for directing traffic between different subnets or networks. Proper configuration ensures that data flows seamlessly, and network security is maintained. In this comprehensive guide, we will delve into the Basic Configuration of Router: packet tracer, providing a solid foundation for network connectivity.
Importance of Basic Configuration of Router: packet tracer
Before we dive into the specific Basic Configuration of Router: packet tracer, it’s crucial to understand why router configuration is essential:
- Network Segmentation: Routers divide networks into subnets, allowing for logical separation of devices. Proper segmentation enhances security and improves network efficiency.
- Routing and Forwarding: Routers determine the best path for data to travel from source to destination based on routing tables and protocols. This ensures data reaches its intended recipient efficiently.
- Security: Routers often include firewall features, access control lists (ACLs), and Network Address Translation (NAT) capabilities. Configuring these security measures is crucial for protecting the network from threats.
- Quality of Service (QoS): Routers can prioritize certain types of traffic, ensuring that critical data, like VoIP or video streaming, gets the necessary bandwidth and low latency.
Steps of Basic Configuration of Router: packet tracer
Basic Configuration of Router typically involves a series of steps. The exact steps may vary depending on the router model and manufacturer, but the fundamental principles remain consistent. Below are the essential router configuration steps:
1. Access the Router’s Command Line Interface (CLI)
In the packet tracer double-click on router which is required to be configured. Then select CLI as shown in the below image.
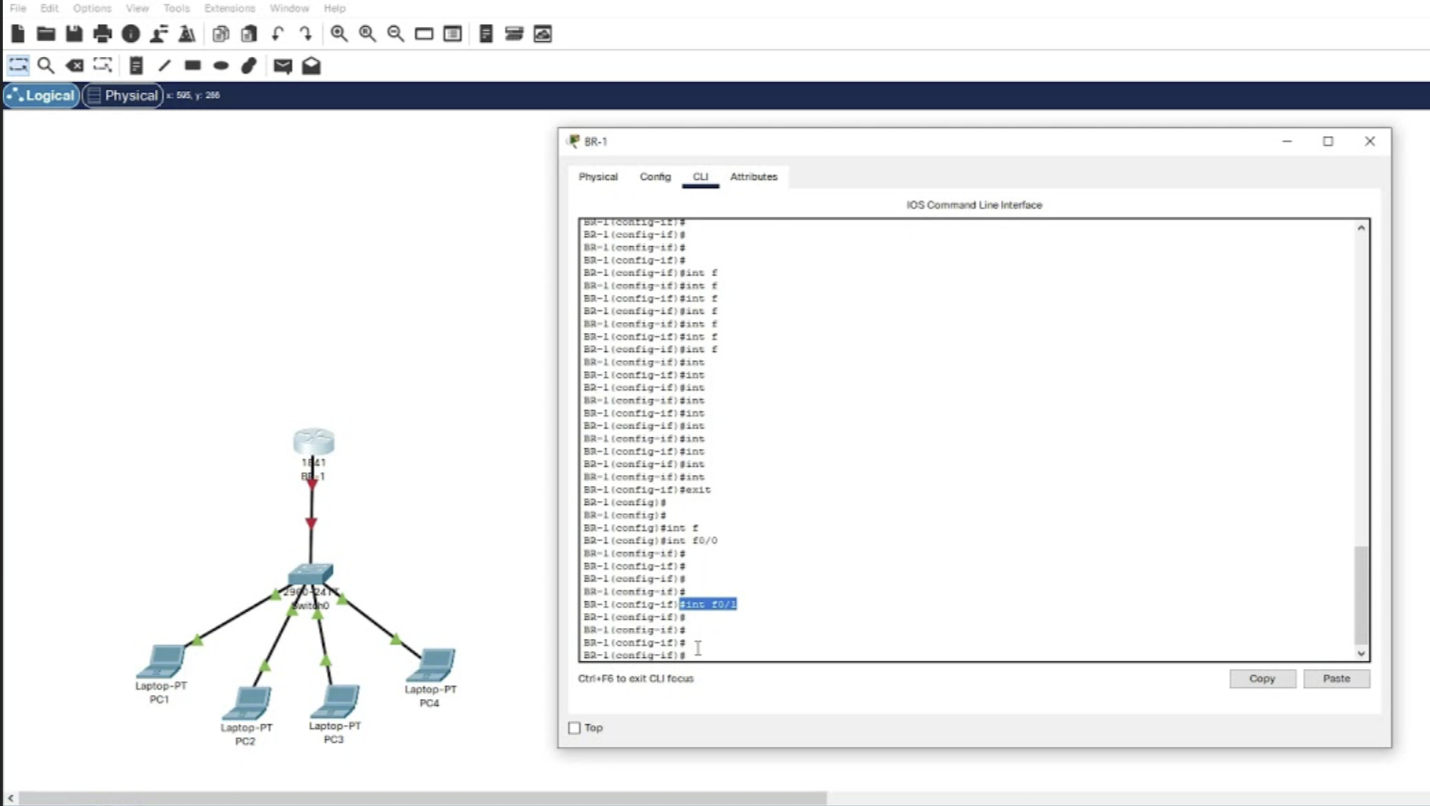
For Live Router configuration, Router configuration is typically performed through the router’s Command Line Interface (CLI). To access the CLI:
- Connect a computer to the router using a console cable or access it via SSH/Telnet if remote access is enabled.
- Open a terminal or command prompt on your computer.
- Use a terminal emulation program (e.g., PuTTY) to establish a connection to the router’s console port or SSH/Telnet IP address.
- Log in to the router using valid credentials (usually a username and password).
2. Enter Global Configuration Mode
Once logged in, you’ll be in the router’s user EXEC mode. To configure the router, you need to enter global configuration mode:
Router> enable
Router# configure terminal
Router(config)#
3. Set a Hostname and Domain Name
Assigning a hostname and domain name helps identify the router and can aid in troubleshooting:
Router(config)# hostname ccna
ccna(config)# ip domain-name example.com
4. Secure Access to the Router
Security is paramount when configuring routers. You should restrict access to the router by setting a strong enable password or secret, and configuring authentication methods like SSH:
ccna(config)# enable secret mysecretpassword
ccna(config)# line vty 0 4
ccna(config-line)# login local
ccna(config-line)# transport input ssh
ccna(config-line)# exit
ccna(config)# username myusername privilege 15 secret myuserpassword
ccna(config)# crypto key generate rsa modulus 2048
ccna(config)# ip ssh version 2
5. Configure Interfaces
Routers have multiple interfaces (e.g., Ethernet, serial) connecting them to different network segments. You must configure these interfaces with IP addresses and subnet masks:
ccna(config)# interface GigabitEthernet0/0
ccna(config-if)# ip address 192.168.1.1 255.255.255.0
ccna(config-if)# no shutdown
Repeat this process for all relevant interfaces.
6. Set Up Routing
Routing is at the core of a router’s functionality. You must configure routing protocols or static routes to determine how data should be forwarded between networks:
Static Routing:
ccna(config)# ip route 192.168.2.0 255.255.255.0 192.168.1.2Dynamic Routing (e.g., OSPF):
ccna(config)# router ospf 1
ccna(config-router)# network 192.168.1.0 0.0.0.255 area 0
7. Implement Network Address Translation (NAT)
If your network uses private IP addresses internally, you’ll likely need NAT to allow devices with private IPs to access the internet:
ccna(config)# ip nat inside source list 1 interface GigabitEthernet0/1 overload
ccna(config)# access-list 1 permit 192.168.1.0 0.0.0.255
ccna(config)# interface GigabitEthernet0/0
ccna(config-if)# ip nat inside
ccna(config-if)# interface GigabitEthernet0/1
ccna(config-if)# ip nat outside
8. Set Up DHCP
To automate IP address assignment to client devices on your network, configure DHCP (Dynamic Host Configuration Protocol):
ccna(config)# ip dhcp pool mypool
ccna(dhcp-config)# network 192.168.1.0 255.255.255.0
ccna(dhcp-config)# default-router 192.168.1.1
ccna(dhcp-config)# dns-server 8.8.8.8
ccna(dhcp-config)# exit
ccna(config)# interface GigabitEthernet0/0
ccna(config-if)# ip dhcp server mypool
9. Set Up Access Control
Access control lists (ACLs) allow you to control which traffic is allowed or denied through the router. For example, you can block specific IP addresses or permit certain services:
ccna(config)# access-list 101 permit tcp any host 192.168.1.10 eq www
ccna(config)# access-list 101 deny ip any host 192.168.1.10
ccna(config)# interface GigabitEthernet0/0
ccna(config-if)# ip access-group 101 in
10. Save the Configuration
After completing the router configuration, it’s essential to save it to non-volatile memory so that it persists after a reboot:
ccna(config)# end
ccna# write memory
11. Test Connectivity
To ensure that your router configuration is functioning correctly, test connectivity between devices on different network segments. Use commands like ping and tracert to verify that data is being routed as expected.
Advanced Configuration (Optional)
The steps outlined above cover the fundamental router configuration. Depending on your network’s complexity and requirements, you may need to delve into advanced configurations. Here are some advanced topics to explore:
- Dynamic Routing Protocols: Implement advanced routing protocols like OSPF or BGP for more dynamic and complex routing.
- Quality of Service (QoS): Configure QoS policies to prioritize certain types of traffic for better performance.
- Redundancy and High Availability: Set up redundancy with protocols like HSRP or VRRP to ensure network availability in case of router failures.
- Security Features: Implement additional security features like intrusion detection/prevention, VPNs, and firewall rules.
- Remote Access: Configure remote access using VPNs or remote management tools for remote administration.
6. Traffic Filtering: Fine-tune ACLs and firewall rules to control traffic at a granular level.
- Monitoring and Logging: Set up monitoring tools and configure logging to track network events and troubleshoot issues effectively.
Conclusion for Basic Configuration of Router: packet tracer
Above are steps of Basic Configuration of Router: packet tracer. Router configuration is a fundamental skill for network administrators and engineers. A well-configured router ensures that data flows efficiently between different network segments while maintaining security and quality of service. By following the essential configuration steps outlined in this guide, you can establish a solid foundation for network connectivity. As your networking knowledge and requirements grow, you can explore advanced configurations to meet the specific needs of your network. Router configuration is an ongoing process, and continuous monitoring and maintenance are essential to keep your network running smoothly.


