
Contents of this article
In this article, I describe the steps to Check the Routing Table on a Router in Packet Tracer. In the world of networking, routers play a critical role in directing data traffic efficiently from source to destination. To make informed decisions about where to forward packets, routers maintain a routing table. A routing table contains information about available routes and helps routers determine the best path for data to reach its destination. In this blog post, we’ll explore how to check the routing table on a router in Packet Tracer, a powerful network simulation tool.
Routing tables on a router
Before we dive into Packet Tracer, let’s briefly understand what a routing table is and why it’s important:
A routing table is essentially a data structure on a router that stores information about how to reach various networks or destinations. It includes entries that specify:
- Destination Network: The network or IP address range.
- Subnet Mask: Defines the network portion of the address.
- Next Hop: The IP address of the next router or gateway that the packet should be sent to.
- Interface: The network interface through which the packet should be forwarded.
- Metric: A value representing the cost or preference of the route, helping the router choose the best path when multiple options exist.
Accessing Packet Tracer
To get started, ensure you have Packet Tracer installed on your computer. Once you’ve launched the program, follow these steps to check the routing table on a router:
Building a Network Topology
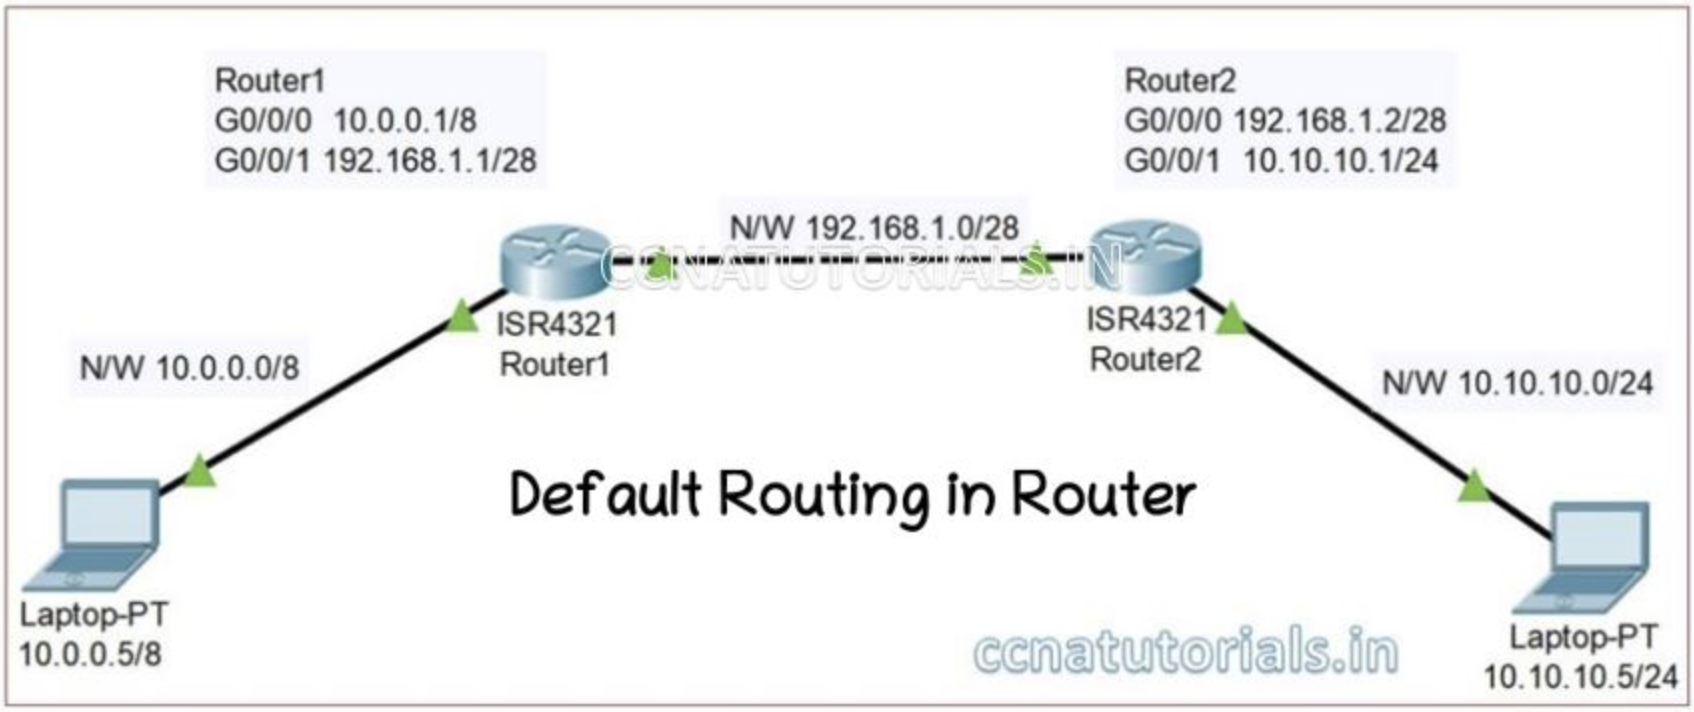
Create a Network Topology: Begin by designing a network topology in Packet Tracer. You’ll need at least two routers interconnected to demonstrate routing.
Add Routers: From the Packet Tracer workspace, drag and drop routers onto the workspace. Connect them using serial cables or Ethernet cables, depending on your design.
Configuring Routers
Configure Router Interfaces: Right-click on each router and select “Configure.” This opens the router’s command line interface. Configure the router interfaces with IP addresses and subnet masks. For example:
Router(config)# interface GigabitEthernet0/0
Router(config-if)# ip address 192.168.1.1 255.255.255.0
Router(config-if)# no shutdown
Enable Routing: To make the router function as a router (routing packets between networks), ensure that routing is enabled. Enter the following command:
Router(config)# ip routingAdd Static Routes (Optional): You can manually add static routes to the router’s routing table if you’re not using a dynamic routing protocol. For instance, to add a static route to network 192.168.2.0 via the next hop 192.168.1.2, use this command:
Router(config)# ip route 192.168.2.0 255.255.255.0 192.168.1.2Configure Dynamic Routing (Optional): If you prefer dynamic routing, configure routing protocols like OSPF or EIGRP. These protocols will automatically populate the routing table based on network topology and routing updates.
Checking the Routing Table
Access the Command Line Interface: To access the router’s command line interface again, click on the router and select “CLI.”
View the Routing Table: To view the routing table, enter the following command:
Router> show ip routeThis command will display the routing table entries, including the destination networks, subnet masks, next hop addresses, outgoing interfaces, and metrics. You’ll see a list of all routes currently known to the router.
Interpreting the Routing Table
When you check the routing table, you’ll see a list of entries that the router uses to make forwarding decisions. Here’s a breakdown of what each column in the routing table represents:
- Codes: These are routing codes that indicate how the route was learned. Common codes include C (connected route), S (static route), and O (OSPF route).
- Network: The destination network or IP address range.
- Mask: The subnet mask associated with the destination network.
- Gateway: The IP address of the next hop router or gateway.
- Interface: The outgoing network interface used to reach the destination.
- Metric: The metric or cost associated with the route, which helps the router determine the best path when multiple routes exist.
- Uptime: This column indicates how long the route has been in the routing table.
Conclusion on Check the Routing Table on a Router in Packet Tracer
In summary, the above steps are useful to Check the Routing Table on a Router in Packet Tracer. Checking the routing table on a router is a fundamental task for network administrators and engineers. In Packet Tracer, a versatile network simulation tool, you can easily access and view the routing table by accessing the router’s command line interface and using the “show ip route” command. Understanding the routing table is crucial for troubleshooting network issues, optimizing routing paths, and ensuring efficient data traffic flow in real-world networking scenarios.
By following the steps outlined in this blog post, you can gain valuable hands-on experience in checking and interpreting routing tables in a simulated network environment. This knowledge is a vital component of network management and a valuable skill for anyone working with routers and network infrastructure. I hope you found this article helpful related to Check the Routing Table on a Router in Packet Tracer. You may drop a comment below or contact us for any query related to the contents of this website.


