In this article I describe the configuration of Routing Information Protocol RIP in a small network. The configuration of Routing Information Protocol RIP is very easy and can be done by command line mode of router. lets discuss some important technical terms related to configuration of Routing Information Protocol RIP in this article.
Routing Information Protocol RIP
RIP version 1 generally known as RIP is supports only classfull network schema. While RIP version 2 supports the classless network schema also. RIP use UDP port 520 for advertisement the routing information on network. Routing Information Protocol RIP supports maximum 15 hop(16 infinity) for destination network. The 16th hop supposed as infinity hop. All RIP response packets broadcast every 30 seconds. If any update failed to get up to 180 second, the entry removed automatically. 180 second is invalid time for RIP broadcast packets.
Routing Information Protocol RIP advertise the connected network is to neighbour routers. All RIP enable router do this on a fix time interval. By sharing and updating all network id in routing table. All routers know about the different networks in internetwork. Routing information protocol helps router to select the best path for data packets. RIP is a pure distance vector protocol. On receiving multiple requests for same destination network of data packets RIP decided on hop count. The route which have minimum hop count is selected on priority. The algorithm used by RIP for select best path for data packet routing is known as Bellman-Ford algorithm. Hop count is metric which is preferred by RIP enabled network devices.
Routing Information Protocol Messages
Routing information protocol used only two types message. First is request RIP message and second is RIP response message. You can understand the message type by its name. a RIP request message broadcast to check any new change in the network. RIP request message also sends by a router when the RIP enabled router to come online. On request RIP message all routers reply with RIP response message so the requisite router can update the routing table.
Versions of Routing Information Protocol
Routing Information Protocol is of three types RIP, RIPv2 and RIPng. RIP is also known as RIPv1 which is first version of RIP family. RIPv1 do not supports the class less network schema. To check the RIP status, you can use the command “debug ip rip” in privilege command mode. To overcome the drawback of classfull network schema RIPv2 invented by IETF. RIPv2 supports VLSM (variable Length Subnet Mask). RIPv2 announce the routes by multicasting on 224.0.0.9 IP address while RIPv1 broadcast the routing table on 255.255.255.0. RIPv2 has another feature that summarise the network addresses. RIPng is the latest version with some advance features.
Configuration of Routing Information Protocol (RIP)
Configuration of Routing Information Protocol (RIP) in router is very easy with some few commands. Routing information protocol (RIP) allow a router to send the complete routing table to neighbour routers. Same process done by all RIP enabled routers in a network. Remember one thing the network should be small. RIP supports max 15 routers in a network.
The 16th router considered as unreachable for first router. So if we configure more than 15 router with RIP enable network the network beyond 15 router will be unreachable. So keep this thing in mind before going to use RIP function in a network. RIP protocol update the routing table after every 30 seconds. Configuration of routing information protocol (RIP) is beneficial for small networks. RIP has administrative distance 120 by default. RIP v1 broadcast the routing table on 255.255.255.255.
RIP version 1 supports only classfull network schema. All the device in a network should use a same subnet mask. We can say RIP is a classfull and distance vector dependent protocol. Hop count metrics used to select the best path for data packets for destination network. We need to enable the RIP routing protocol in router and add the networks connected with the router. The information automatically shared in internetwork for all routers automatically.
Configuration of routing information protocol in a network
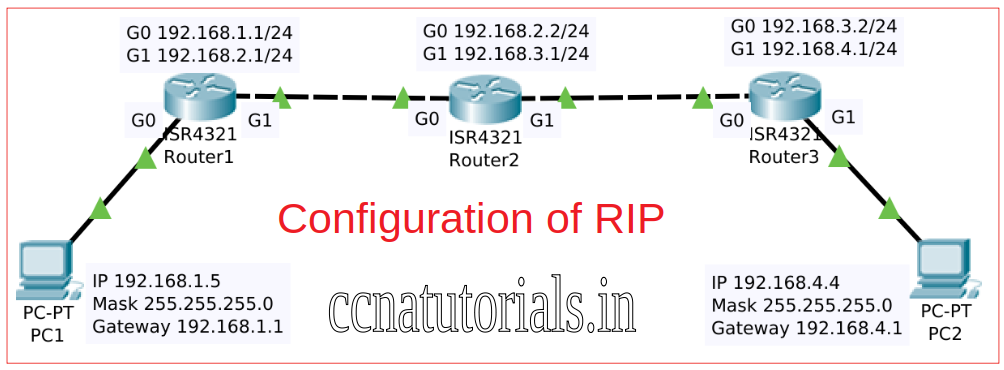
I created the network as shown below to explain the routing information protocol version 1 (RIP).

You can see here I am using only three routers for configuration of routing information protocol. There are 4 network ID connected in this internetwork. All 4 network Ids are different. The IP address scheme you can understand as shown with each device. In very first network PC1 is connected with Router1 on 192.168.1.0/24. Router1 and Router2 are connected with network ID 192.168.2.0/24. Similarly Router2 and Router3 connected with network ID 192.168.3.0/24. The fourth network id is 192.168.4.0/24 via which the Router3 and PC2 are connected. PC are assigned the IP address as shown in above figure. Similarly all Routers interfaces are configured as shown in picture.

Configuring IP address on both interface of Router 1
 Router1>enable
 Router1#
 Router1#configure terminal
 Enter configuration commands, one per line. End with CNTL/Z.
 Router1(config)#interface GigabitEthernet0/0/0
 Router1(config-if)#no shutdown
 Router1(config-if)#ip address 192.168.1.1 255.255.255.0
 Router1(config-if)#exit
 Router1(config)#interface GigabitEthernet0/0/1
 Router1(config-if)#no shutdown
 Router1(config-if)#ip address 192.168.2.1 255.255.255.0
 Router1(config-if)#end
 Router1#copy running-config startup-config
 Destination filename [startup-config]? [Press Enter]
 Building configuration...
 [OK]
 Router1#
Configuring IP address on Both interfaces of Router 2
 Router2>enable
 Router2#
 Router2#configure terminal
 Enter configuration commands, one per line. End with CNTL/Z.
 Router2(config)#interface GigabitEthernet0/0/0
 Router2(config-if)#no shutdown
 Router2(config-if)#ip address 192.168.2.2 255.255.255.0
 Router2(config-if)#exit
 Router2(config)#interface GigabitEthernet0/0/1
 Router2(config-if)#no shutdown
 Router2(config-if)#ip address 192.168.3.1 255.255.255.0
 Router2(config-if)#end
 Router2#copy running-config startup-config
 Destination filename [startup-config]? [Press Enter]
 Building configuration...
 [OK]
 Router2#
Configuring Ip address on both interfaces of Router 3
 Router3>enable
 Router3#
 Router3#configure terminal
 Enter configuration commands, one per line. End with CNTL/Z.
 Router3(config)#interface GigabitEthernet0/0/0
 Router3(config-if)#no shutdown
 Router3(config-if)#ip address 192.168.3.2 255.255.255.0
 Router3(config-if)#exit
 Router3(config)#interface GigabitEthernet0/0/1
 Router3(config-if)#no shutdown
 Router3(config-if)#ip address 192.168.4.1 255.255.255.0
 Router3(config-if)#end
 Router3#copy running-config startup-config
 Destination filename [startup-config]? [Press Enter]
 Building configuration...
 [OK]
 Router3#
After creating the network and assigned IP address to all devices, try to ping PC1 with PC2. You will got the below result after pinging both PC with each other. Both PC are unreachable for each other. We have to configure routing information protocol in all three routers.
 C:\>ping 192.168.4.5

 Pinging 192.168.4.5 with 32 bytes of data:

 Reply from 192.168.1.1: Destination host unreachable.
 Reply from 192.168.1.1: Destination host unreachable.
 Reply from 192.168.1.1: Destination host unreachable.
 Reply from 192.168.1.1: Destination host unreachable.

 Ping statistics for 192.168.4.5:
 Packets: Sent = 4, Received = 0, Lost = 4 (100% loss),
  C:\>
Configuration Routing Information Protocol in Router1
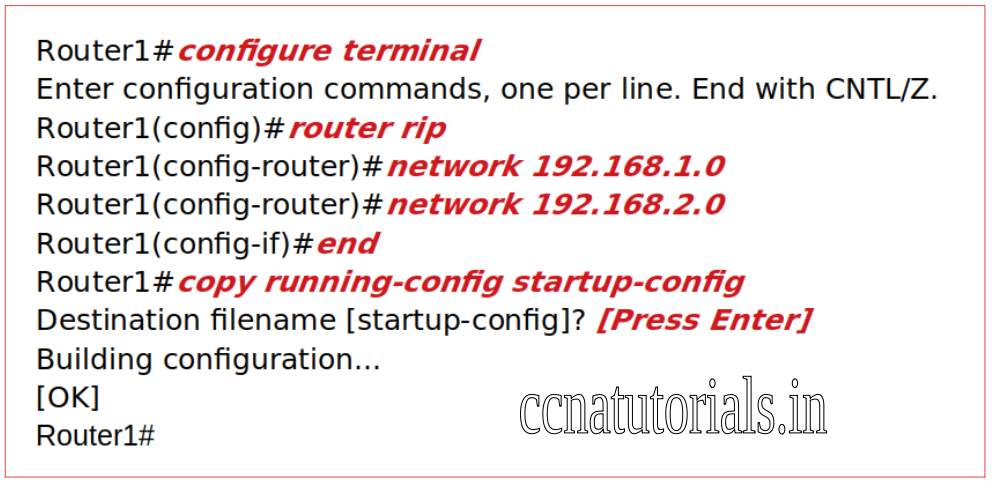
We know that Router 1 connected with network ID 192.168.1.0/24 and 192.168.2.0/24 on both GigabitEthernet ports. We need to enable RIP and add both network ID in the RIP configuration. Below commands required to run in Router1.
 Router1#configure terminal
 Enter configuration commands, one per line. End with CNTL/Z.
 Router1(config)#router rip
 Router1(config-router)#network 192.168.1.0
 Router1(config-router)#network 192.168.2.0
 Router1(config-if)#end
 Router1#copy running-config startup-config
 Destination filename [startup-config]? [Press Enter]
 Building configuration...
 [OK]
 Router1#
Configuration Routing Information Protocol in Router2
We know that Router 2 connected with network ID 192.168.2.0/24 and 192.168.3.0/24 on both GigabitEthernet ports. We need to enable RIP and add both network ID in the RIP configuration. Below commands required to run in Router2.
 Router2#configure terminal
 Enter configuration commands, one per line. End with CNTL/Z.
 Router2(config)#router rip
 Router2(config-router)#network 192.168.2.0
 Router2(config-router)#network 192.168.3.0
 Router2(config-if)#end
 Router2#copy running-config startup-config
 Destination filename [startup-config]? [Press Enter]
 Building configuration...
 [OK]
 Router2#
Configuration Routing Information Protocol in Router3
We know that Router 3 connected with network ID 192.168.3.0/24 and 192.168.4.0/24 on both GigabitEthernet ports. We need to enable RIP and add both network ID in the RIP configuration. Below commands required to run in Router3.
 Router3#configure terminal
 Enter configuration commands, one per line. End with CNTL/Z.
 Router3(config)#router rip
 Router3(config-router)#network 192.168.3.0
 Router3(config-router)#network 192.168.4.0
 Router3(config-if)#end
 Router3#copy running-config startup-config
 Destination filename [startup-config]? [Press Enter]
 Building configuration...
 [OK]
 Router3#
I have done the RIP configuration in all three routers. After finishing the configuration in Router 3 we have to wait for 30 seconds so all routers update their routing table according to the routing information protocol. After 30 seconds try to ping the PC2 with PC1 you will got the below result. You see in above configuration I did not mention any subnet mask in any router configuration of routing information protocol.
 C:\>ping 192.168.4.5
 Pinging 192.168.4.5 with 32 bytes of data:
 Reply from 192.168.4.5: bytes=32 time<1ms TTL=125
 Reply from 192.168.4.5: bytes=32 time<1ms TTL=125
 Reply from 192.168.4.5: bytes=32 time=1ms TTL=125
 Reply from 192.168.4.5: bytes=32 time=1ms TTL=125


 Ping statistics for 192.168.4.5:
 Packets: Sent = 4, Received = 4, Lost = 0,
 Approximate round trip times in milli-seconds:
 Minimum = 0ms, Maximum = 1ms, Average = 0ms
 C:\>
Checking of Routing Information Protocol in Router
I have explained how RIP works and how to configure RIP in a network. Now the last section of this article tells you how to check the routing information protocol in a RIP enable router. The example is for Router1 see the below example.
 Router#show ip route rip
 192.168.2.0/24 is variably subnetted, 2 subnets, 2 masks
 R 192.168.3.0/24 [120/1] via 192.168.2.2, 00:00:11, GigabitEthernet0/0/1
 R 192.168.4.0/24 [120/2] via 192.168.2.2, 00:00:11, GigabitEthernet0/0/1
 Router#
You can see the bold result of command “show ip router rip” inform us about the RIP command in Router 1 . similarly you can check the command in all Routers.
I explained the configuration of Routing Information Protocol (RIP) in this article. I hope you found this article helpful. For any query or suggestion on this article contact us or drop a comment below. Your suggestions are always welcome by us.


